
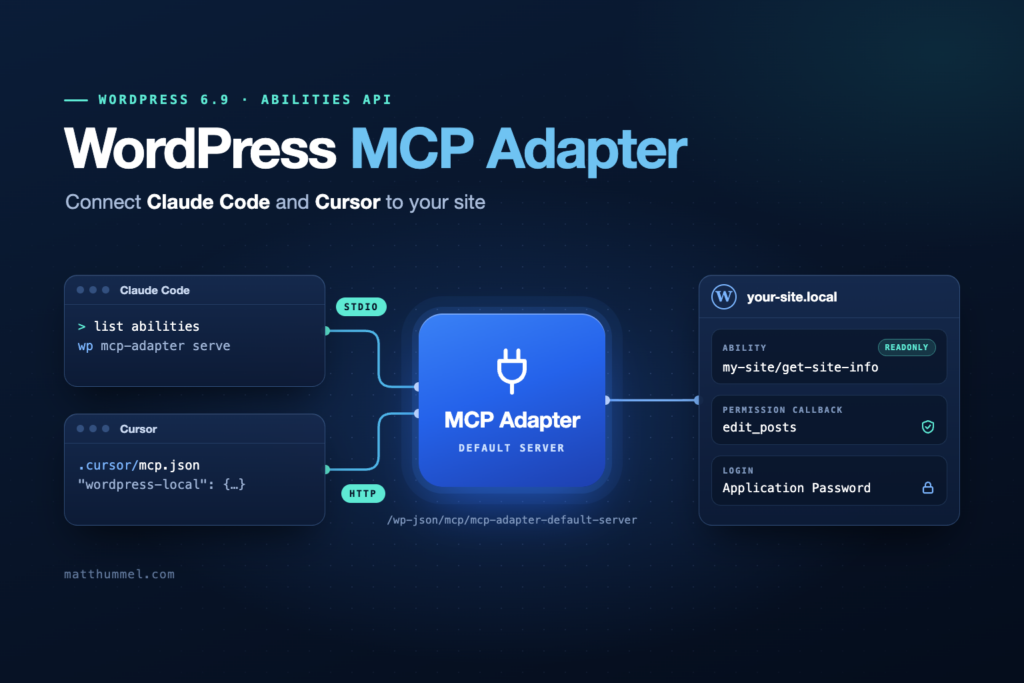
The WordPress MCP Adapter lets AI tools like Claude Code and Cursor find and run actions on your WordPress site. It takes the abilities you register with the Abilities API and shares them over the Model Context Protocol (MCP). Below, you’ll install the adapter, expose one ability, find the default endpoint, log in with an Application Password, and run a few safety checks.
At a glance
- Needs: WordPress 6.9 or newer and PHP 7.4 or newer. WordPress 6.9 includes the Abilities API in core.
- Plugin: the official MCP Adapter from the WordPress GitHub organization. The latest release when I wrote this guide was 0.6.1.
- Opt in: an ability shows up on the default MCP server when its meta has
mcp.publicset to true. A broaderpublicflag in meta works too. - Default endpoint:
/wp-json/mcp/mcp-adapter-default-server - Login: a WordPress user and an Application Password.
- Try it on a local site first. An AI tool gets the same rights as the user you connect it with.
What MCP is, in plain terms
MCP is an open standard that gives AI apps a shared way to connect to outside tools and data. An MCP server lists the tools it offers. An MCP client, like Claude Code or Cursor, reads that list and can call those tools when you ask it to.
WordPress already has its own way to describe actions, called the Abilities API, which I covered in my first Abilities API integration post. Each ability has a name, an input schema, an output schema, a permission check, and a callback. The MCP Adapter takes those abilities and puts them in a form an MCP client can read.
Here’s how one request moves through the stack. You ask Claude Code or Cursor a question, the client calls the adapter’s server on your site, and the adapter looks up the matching ability. WordPress then runs that ability’s permission check for the connected user before any code executes, and the result travels back to the client as structured data.
Step 1: Install the WordPress MCP Adapter
The adapter isn’t in core yet, so you add it yourself. You can install it as a plugin, or bundle it inside your own plugin as a Composer package. For a first test, I’d go with the plugin because it’s simpler.
The Composer route makes sense once you ship a plugin that depends on the adapter. Running composer require wordpress/mcp-adapter installs it alongside your own code, so the adapter travels with your plugin.
- Download the latest release from the WordPress/mcp-adapter repository.
- On a local or staging site, go to Plugins, then Add New, and upload it.
- Turn it on. Check that your site runs WordPress 6.9 or newer.
The adapter is still under version 1.0, so names and commands may change from one release to the next. Before you copy anything below, read the README for the version you installed.
Step 2: Mark an ability as public for MCP
Registering an ability won’t share it with AI tools by itself. You have to opt in by adding 'mcp' => array( 'public' => true ) inside the ability’s meta array. That flag shares the ability over MCP and nothing else. The adapter README also describes a broader public flag in meta, which the default server honors too.
Here’s a small example that only reads data. It returns the site name and tagline, and it only runs for users who can edit posts.
add_action( 'wp_abilities_api_categories_init', function () {
    wp_register_ability_category( 'my-site', array(
        'label'       => 'My Site',
        'description' => 'Abilities for this site.',
    ) );
} );

add_action( 'wp_abilities_api_init', function () {
    wp_register_ability( 'my-site/get-site-info', array(
        'label'               => 'Get site info',
        'description'         => 'Returns the site name and tagline.',
        'category'            => 'my-site',
        'output_schema'       => array(
            'type'       => 'object',
            'properties' => array(
                'name'    => array( 'type' => 'string' ),
                'tagline' => array( 'type' => 'string' ),
            ),
        ),
        'execute_callback'    => function () {
            return array(
                'name'    => get_bloginfo( 'name' ),
                'tagline' => get_bloginfo( 'description' ),
            );
        },
        'permission_callback' => function () {
            return current_user_can( 'edit_posts' );
        },
        'meta'                => array(
            'annotations' => array( 'readonly' => true ),
            'mcp'         => array( 'public' => true ),
        ),
    ) );
} );
The readonly annotation tells clients this ability doesn’t change anything. The permission callback runs on every call, even when the request comes from an AI tool.
Step 3: Know the default server endpoint
Once the plugin is on, the adapter sets up a default MCP server. You’ll find it at this path on your site:
https://your-site.local/wp-json/mcp/mcp-adapter-default-serverThis server doesn’t list each public ability as its own tool. It offers three general tools: one finds the public abilities, one gets details about a single ability, and one runs an ability. The README calls them mcp-adapter/discover-abilities, mcp-adapter/get-ability-info, and mcp-adapter/execute-ability. So the client finds your ability first, then calls it.
To list each ability as its own tool, you can register a custom server. It’s a good thing to try once the default server is working.
Step 4: Create an Application Password
Application Passwords come built into WordPress. They let an outside app log in through the REST API without your main password, and you can cancel each one on its own.
- Go to Users, then Profile, for the account the AI tool will use.
- Scroll down to Application Passwords. Type a name like “Cursor local” and click Add.
- Copy the password right away. WordPress only shows it once.
I suggest making a separate user for this and giving it the lowest role that still passes your permission checks. Don’t connect an AI tool as an admin unless you have a good reason.
Step 5: Connect Cursor and Claude Code
For an HTTP connection, the adapter docs suggest a small proxy package called @automattic/mcp-wordpress-remote. It runs through npx on your computer and takes care of the login for you.
The two connection types suit different setups. STDIO runs the server through WP-CLI on the same machine as the site, so it needs no password and works well for local development. HTTP goes through the REST API with an Application Password, which makes it the option for staging sites and anything you can’t reach from a terminal.
Cursor
Add this to .cursor/mcp.json in your project. Then restart Cursor:
{
  "mcpServers": {
    "wordpress-local": {
      "command": "npx",
      "args": ["-y", "@automattic/mcp-wordpress-remote@latest"],
      "env": {
        "WP_API_URL": "https://your-site.local/wp-json/mcp/mcp-adapter-default-server",
        "WP_API_USERNAME": "mcp-user",
        "WP_API_PASSWORD": "xxxx xxxx xxxx xxxx xxxx xxxx"
      }
    }
  }
}
Claude Code
If WP-CLI works on your local site, you can skip HTTP and use STDIO. This command runs the server through WP-CLI as the user you pick:
claude mcp add wordpress-local -- wp --path=/path/to/site mcp-adapter serve --server=mcp-adapter-default-server --user=mcp-userYou can also give Claude Code the same npx setup that Cursor uses. Once you’re connected, ask the tool to list the abilities on your site, and you should see my-site/get-site-info in the list.
Safety checks before you go further
- Start with read-only abilities. Share abilities that only fetch data before you add any that create, edit, or delete.
- Keep permission callbacks strict. Never return true for everyone. The callback is what really keeps people out.
- Keep passwords out of git. If
.cursor/mcp.jsonholds a password, add it to.gitignore. - Look before you approve. Both tools ask before they run a tool call. Read the input before you say yes.
- Test a failed permission check. Get one read-only ability working, then see what happens when the check says no. That test teaches you more about safety than a success does.
- Cancel the password when you’re done. Delete the Application Password once you stop testing.
- Stay local until you trust it. Don’t point an AI tool at a client’s live site on day one.
Frequently asked questions
Is the WordPress MCP Adapter part of WordPress core?
No. WordPress 6.9 includes the Abilities API in core, but the MCP Adapter is a separate plugin you install from GitHub. It’s still under version 1.0, so expect changes between releases.
Do I need WP-CLI to connect Claude Code?
No. WP-CLI gives you a STDIO connection on a local site. Without it, you can use the HTTP endpoint with the npx proxy and an Application Password, the same way Cursor connects.
Can an AI tool change my site through MCP?
Only through abilities you’ve marked as public, and only when the connected user passes each ability’s permission callback. Start with read-only abilities and a user with a low role.
Why doesn’t my ability show up in Cursor or Claude Code?
Check three things first. The ability’s meta needs the mcp public flag, the adapter plugin has to be active, and the site has to run WordPress 6.9 or newer. Then ask the tool to list the abilities again.
I explain how I split work between these tools in my AI workflow for WordPress development. I also wrote about where AI speeds up my WordPress work, and where it doesn’t.
Need help adding abilities or MCP support to a plugin or client build? See how I work with teams or get in touch.

Comments
No comments yet. ASCII, code, and plain punctuation are welcome.